Unknown's avatar

About tgawalt

I am a photographer growing as an artist associated with Dream Imagine Believe Photography and You Can Learn Photography.

How “shutter speed” plays it’s role in exposure

With a DSLR the “shutter” is a mechanical mechanism. In a compact, bridge or phone camera the shutter is non-mechanical and is achieved by using an electronic method of reading the pixels of the sensor in groups of lines over a period of time. To simplify our discussion we will think of the shutter as a mechanism.

The “shutter” can be imagined as a curtain in front of the camera sensor. This curtain opens for a specific period of time allowing the light to reach the sensor and then closes to block the light from the sensor. The “duration” of time the light is contacting the sensor is referred to as the “shutter speed” and is what contributes to the exposure.

Mechanical Shutter

In the diagram step 1 shows the shutter in it’s normal closed state. When we push the “shutter button” on our camera the shutter opens, as shown in step 2, by the 1st curtain moving to the top and allowing the light to reach the sensor. Once the duration of the shutter speed has been reached the shutter closes, as shown in step 3. Finally the shutter mechanism resets to the normal closed state by the 1st and 2nd curtain moving together back to the bottom as shown back at step 1.

To recap we have learned in previous lessons that “aperture” is a hole in the lens which allows an amount of constant light into the camera based on the size of the hole we set. The “shutter speed” controls the “duration” of time the light is allowed to reach the sensor. The combination of these two settings, aperture and shutter speed in addition to the amplification (iso) of the sensor  determines the “exposure“, or the brightness of our captured image.

To find out how to set the shutter speed on your camera, refer to a previous lesson How to set your Camera’s; Aperture, Shutter Speed, and ISO.

Shutter Speed Typical Values

Shutter speed settings are in fractions of seconds to seconds in duration, which can be from 1/4000 (fast, less light), or 1/8000 on advanced cameras, of a second down to 30 (slow, more light) seconds in duration and depending on the mode you have selected you can control the this speed in full stops, typical values shown in bold, or 1/3 stop increments.

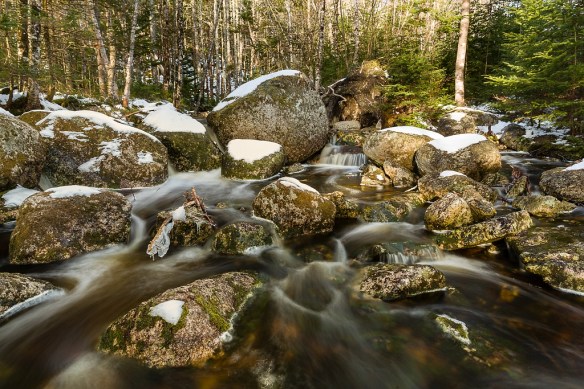
The shutter speed setting can affect sharpness and/or blur in your captured image, which we will discuss in our next lesson.

What is “hyperfocal” distance?

In our last lesson on depth of field we discussed that the aperture, focal length and the distance to the subject (focus point) determines how much of the image is within acceptable focus. With any given camera, aperture setting, and focal length there is an optimum point at which to focus that will maximize the amount of the image that will be within acceptable focus. This optimal focus point is referred to as the “hyperfocal distance“.

Last Signs of Snow_©Trevor Awalt_MG_0329-Edit_s

f/16, 2sec, ISO 100, @24mm

The stream image was shot with an aperture of f/16 at a focal length of 24mm, looking at the table, generated from DoFMaster Depth of Field Table calculator,  we can see that by focusing at 5 feet the whole image from about 2 feet 3 inches to infinity () will be within acceptable sharpness. This worked out well because the foreground rock was about 6 feet away. looking at the table again, you see I could have used f/11 at 1sec focused at 6 feet to achieve the same result. From the table, notice the difference at f/11 and 5 feet which does not achieve infinity and as a result would not have worked.

Hyperfocal Table_5D-24mm

Understand that “acceptably sharp” does not mean that your image will be tack sharp throughout the entire image using the hyperfocal distance technique. It has been suggested by experienced landscape photographers that focusing using 2x the hyperfocal distance will achieve a much improved sharpness to the entire image.

Take a look at the following YouTube video resources on focusing techniques, pay close attention to how each one of these landscape photographers decide on their focus point as it’s important to understand what condition or assumption they are making in any specific case.
Nigel Danson, Mastering Focus, YouTube video (18 min 5 sec)
Thomas Heaton, Where did I focus, YouTube video (17 min 40 sec)
Dave Morrow, My sharp focus camera technique, YouTube video (27 min 5 sec)

Now that we have reviewed the main aspects of aperture, in the next blog post we will move on to our next important camera setting the shutter speed.