
For this month, November 2023, the theme challenge is “Beginning Portraiture“. Carrying on from and taking what we learned from July’s theme challenge about Environmental Portraits, we want to prepare for December when we have the opportunity to photograph family during the Christmas season. So this month we’ll concentrate on a few important techniques to create some simple “portraits” using natural light. You can take a portrait of pretty much anyone, but work with the person to have them dress accordingly to help portray your story, use any props that are appropriate and pose them to make them look as flattering as possible.
When getting started taking a portrait it helps by considering to capture a subject making the best use of the available light and to show the character of the subject by telling a story and/or have the subject engaged with the camera. Here are a few, but not limited to, things to consider: 1) quality of light, there are three main light qualities hard, soft, and colour. Hard light causes shadows and in many cases not flattering for a portrait but can be helpful depending on the subject and the story such as being used as a hair or rim light. Soft light is most faltering for portraiture especially for women which can be available on an overcast day or in what is called open shade. Colour of light in the case of natural light can add warmth or coolness to the subject depending on the time of day the portrait is taken. 2) direction of light, the angle of light to the subject can make a big difference in how we see the subject. For a typical portrait, to have the subject look their best we prefer soft light on their face, so using window light on an overcast day or with diffusion the subjects face will be smoother with minimal lines. As the light is on more of an angle the deeper the shadows will appear as you increase the angle of light, this technique is best for a more masculine subject. If the light is behind the subject you can use it as rim or hair light and then push light back to the subjects face by using a reflector to help brighten the subjects face. 3) position the subject, make the subject as comfortable as possible but position them to best suit their body shape. If the person is curvy it’s best to shoot them on an angle (not straight on) to help them look more slim and limit the use of non-formfitting clothing, remember covering up with a baggy sweater is not flattering. Also try to have separation between their arm and body. 4) head in a clean spot, It is always a good idea to not have objects (such a tree limbs etc..) that are in the background to be coming out of or intersecting the head or neck of your subject. 5) Frame the subject, sometimes there are objects in the background such as windows that you can use to frame your subject. 6) position the hands, Pay particular attention to place the hands in a natural elegant position and be-careful as to where the hands are pointing. 7) separation of subject from the background, you can use a wider aperture (smaller f/stop), and/or position your subject further from the background as well as use a darker background to separate your subject from the background, in other words leverage depth of field techniques.
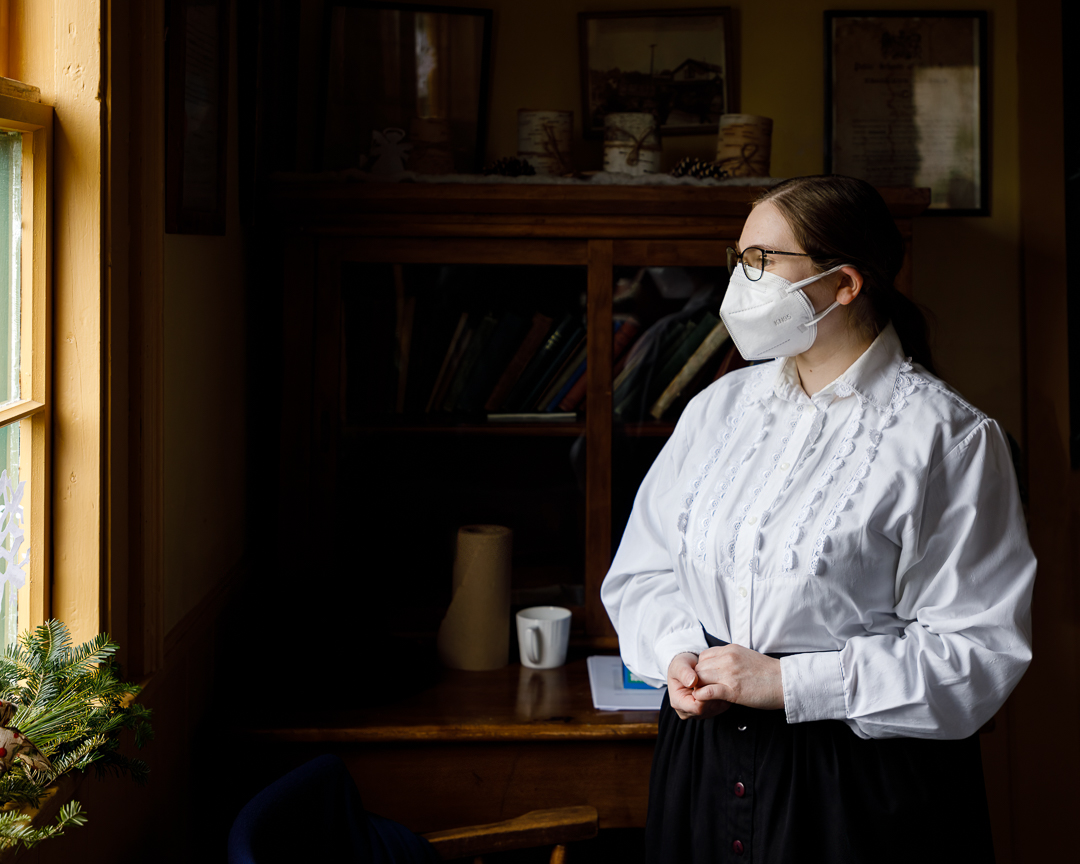
Here is an example of a volunteer acting as a school teacher at The Ross Farm Museum in New Ross Nova Scotia. It was slightly overcast outside so the window light was a bit soft, and in order to have the light even softer on the subject I asked her to move about 3 feet away from the window. I also got her to look out the window so the light would be even on her face to make it more flattering, and also asked her to pose, as well as her hands, as if she were thinking of something. As far as composition I included a bit of the window frame and had her stand to frame her in as best as possible within the book shelf in the background to help with the school teacher in the classroom story. I also made use of the fact that the room was dark to help make her stand out from the backgound. Note, I should have removed a few distractions; the white angel from the bookshelf at the top of her head, and the white paper by her left shoulder/arm, which is an example of things to be aware of, part of what is called perimeter patrol. The distractions can be removed in Photoshop with the result shown in the second image, but it’s always better to remove them to capture it in camera as best as possible..

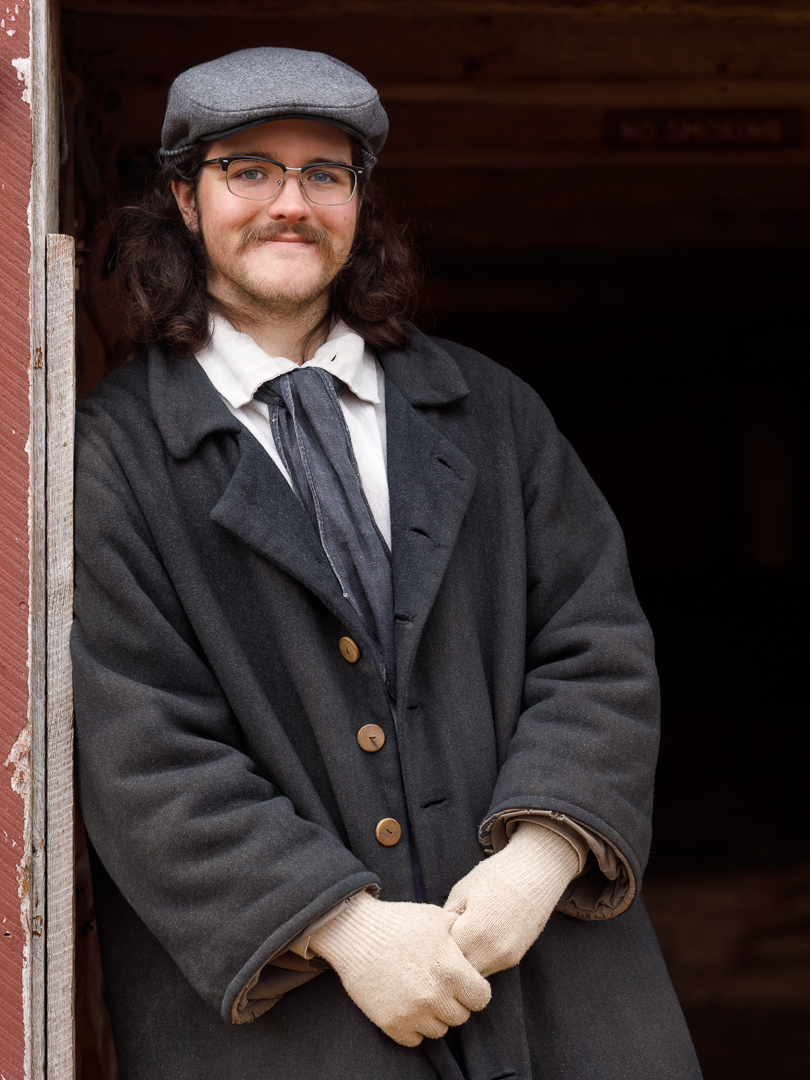
In the next example we make use of open shade to create soft light. This was an image of a volunteer working as a stable hand at the Ross Farm Museum located in New Ross, Nova Scotia. I had him stand in the door way of the barn (open shade); 1) to provide softer light, 2) to give him something to lean against to make him more comfortable, and 3) kept the background of the inside of the barn dark help separate the subject from the background. I got him to position his jacket to show his scarf and then position his hands in a relaxed way as if he were having a casual conversation. Then I had him look into the camera with an inviting smile. Note with glasses to always be aware of any reflections that may be present and check your image to make sure you have taken that into consideration.
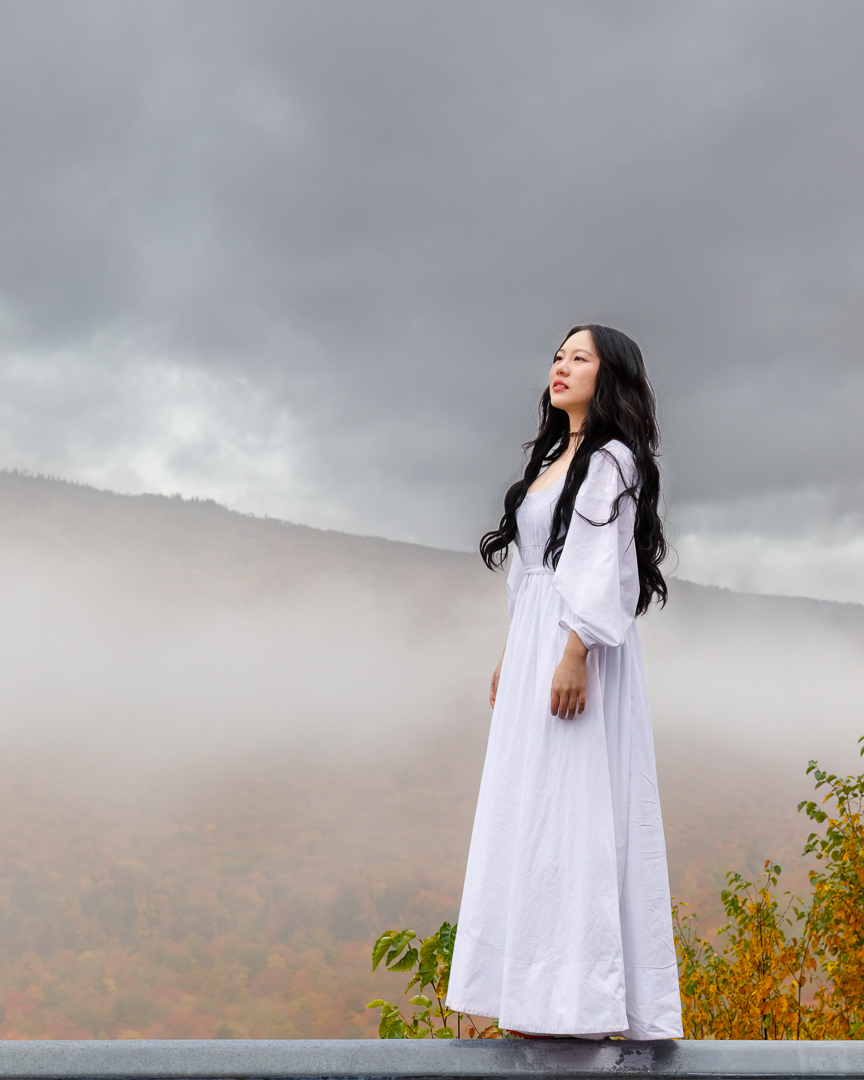
This final example image was taken on the Cabot Trail Cape Breton Island Nova Scotia during the fall 2021 and this lady got out of their car and posed for her friends. In this case they had already worked out the details so there were no adjustments necessary. I asked if I could take her photo and she acknowledged it was ok. It can be a lot of fun to take portraits so don’t be afraid to ask, some will say no but some do say yes. Get their email so you can send them the image as a thank you.
Students are encouraged to develop their ability to tell a story or invoke an emotion, as well as how to plan and troubleshoot while creating their images. As such it’s important to not only create the image but to also include a “title”, and write a short paragraph about; how they came up with the idea, any interesting back ground that compelled them to make the image, and describe any techniques on how they overcame any obstacles.
As always with our monthly theme challenges we try to seek out an instructional resource, below are a few YouTube video links to give you some hints, tips and ideas on portrait photography basics (in no particular order):
■ Foolproof Natural Light Scenarios | Inside Fashion and Beauty Photography by Lindsay Adler – Adorama (13 min. 56 sec.)
■ 4 Tips for Natural Light Portraits with Tony Gale by B&H Photo Video (2 min. 11 sec.)
■ Finding Good Natural Light for Portraits (‘Good Light’ Series) by Sean Tucker (6 min. 30 sec.)
■ Improve your portraits INSTANTLY with these 5 tips | Take and Make Great Photography with Gavin Hoey – Adorama (8 min. 42 sec.)
If you want to share your image there is no facility to upload your image here, however just paste your social media link of your image in your comment and we’ll be able to see your image. Please note comments are moderated so it will not show up right away, however we do get a notification when any comment is posted so it won’t take long to get approved and subsequently show up. By posting your social media link of your image in your comment, it gives everyone visiting the bog a chance to not only see your image for the challenge but also the ability to look at your other work as well by visiting your social media through your link. We want sharing to be a positive experience and we hope you have fun this month with this challenge.
An important part of improving your photography is practice, which is one aspect of the monthly theme challenge in addition you have an opportunity to learn about different genres, techniques and tips.