Unknown's avatar

About tgawalt

I am a photographer growing as an artist associated with Dream Imagine Believe Photography and You Can Learn Photography.

Creative control with aperture

Aperture_20180909_MG_5347

f/4, 1/400, ISO 400, @100mm

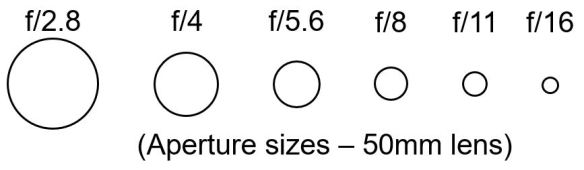
In the last lesson we learned that “aperture” controls the amount of light that reaches the camera sensor, by changing the size of the hole in the lens.

As we change the size of the hole in the lens, not only does it change the amount of light but also has an effect on how much of the image is in focus, called “Depth of Field” (DoF).

We can see from the image of the girl on the left that while her face and body are in focus, the trees in the background are completely out of focus. This is the “creative” control that the “aperture” setting provides, which is the ability to control how much of the image is within acceptable focus. Looking at the ground behind the girl’s foot we see the point where the ground goes from being in focus to blurry and then increasingly blurry the further we look toward the trees in the background.

PeggysCove_©TrevorAwalt_MG_2497-Edit_s

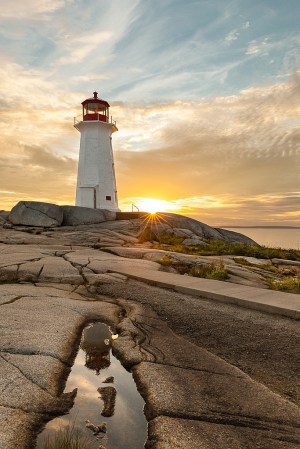
f/16, 1/8, ISO 100, @24mm

Looking at the lighthouse image on the left, we can see with an aperture setting of f/16, all of the image from the puddle reflection through to the lighthouse and then to the sky including the sun are all in focus. By setting our camera to a smaller aperture we can maximize the depth of field.

To summarize, “Depth of Field“, (DoF) is defined as the area of an image that is within acceptable sharpness, in front of and behind the focus point. The larger the aperture, for example f/4 (the image of the girl), the less DoF. Conversely the smaller the aperture, for example f/16 (the image of the lighthouse), the more DoF in an image.

In the next lesson we will learn how to change the aperture setting on your camera.

How “aperture” plays a role in exposure

In my last post I talked about setting a foundation, by first learning about the important aspects of your camera’s controls; aperture, shutter speed, and iso which are the settings that control exposure. “Exposure” is simply the brightness of the photo captured. However, we need to learn about these three controls individually before we can completely understand exposure.

Your camera records light. “Aperture” is simply the diameter of a “hole” in the camera’s lens, that you can control , which determines the amount of light that reaches the camera’s sensor (a component in the camera that records the image).

Aperture sizes 50mm

In the diagram above, notice that “Aperture” is shown in the form of “f/n” where “n” represents the aperture setting on your camera (example; 2.8, 4, 5.6 etc…). Also notice that the lower the aperture setting, the larger the hole. This is because “f/n” represents the inverse of the aperture setting. For example if we take 50/2.8 = 17.9 we see it is a larger number than 50/4 = 12.5.

The “Aperture” setting is referred to as an f-stop meaning full stop. The diagram above shows aperture settings in full stop values. Notice the size of the hole at f/4 is half the size, or half the amount of light, of the hole at f/2.8 and f/5.6 would be half the amount of light of the hole at f/4 reaching the camera sensor etc… Also consider that the amount of light at f/4 is double the amount of light at f/5.6, because the size of the hole at f/4 is double the size of the hole at f/5.6.

For the above discussion think of the amount of light let into the camera by the aperture setting is one of the controls that has an effect on the brightness of your photo.

In the next article we will uncover the creative control behind aperture.