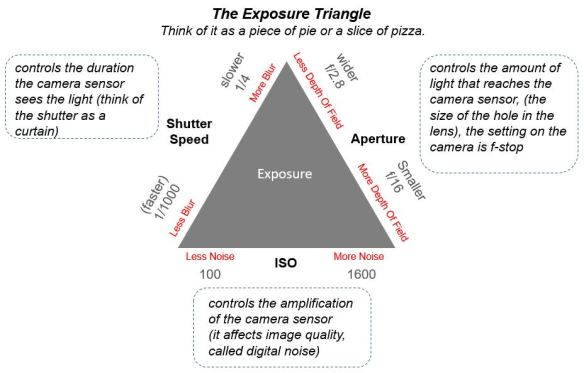
Your camera is a device that takes pictures, but there is a lot going on behind the scenes that the software in your camera takes care of in fractions of a second.
With your camera in an automatic or semi-automatic mode, as you press the shutter button half way down your camera does two operations; 1) focuses on the subject you are pointing at and 2) measures the exposure so the camera can set what it thinks are the correct aperture, shutter speed and ISO settings. Once you finish pressing the shutter button all the way down the camera captures the image. As you review the captured image you may notice that the result may not be quite what you expected, it may be too bright or too dark depending on the decision that the camera made based on the current lighting conditions, main subject, and surrounding area.
The camera software does not yet have the artificial intelligence to always determine the optimum settings to achieve a correct exposure for any given scene. This is where you, have the ability to control the camera to make the next image a bit brighter or darker depending on the “Exposure Compensation” setting.
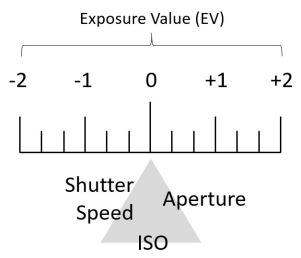
In automatic, or semi-automatic modes you can force the camera’s light meter to a brighter or darker setting by changing the “Exposure Compensation”. “Exposure Compensation” is also referred to as “Exposure Value” or “EV” for short. The first time you set the EV away from the default setting of “0” and you want the next image to be brighter move the setting toward “+1”, or if you want the next image to be darker move the setting toward “-1”. Each mark on the meter is in 1/3 stop increments in which three movements equals a stop.
This tells the camera that what ever it thinks is the right exposure, you have chosen to make it brighter or darker depending on your EV setting. This is how you work collaboratively with the camera to create a proper exposure even though the camera is in an automatic or semi-automatic mode.
As an example lets see how to change the EV setting on two Cameras:
- To change the EV setting on a Canon SX30 in aperture priority mode, “Av” (manual pg 73); press the “+/-” or up arrow button, on the back of the camera, until you see +/-0, then turn the “dial”, on the back of the camera, clockwise to make the EV brighter, positive direction, or counter clockwise to make it darker, negative direction.
- To change the EV setting on a Canon T6i in aperture priority mode, “Av” (manual pg 159); press the “Av+/-” button, on the back of the camera, and then turn the “main dial”, on the top right of the camera, clockwise to make the EV brighter, positive direction, or counter clockwise to make it darker, negative direction.
As an exercise, use your camera to take three pictures of the same subject; image (1) with the EV set to “0”, image (2) with the EV set to “+1”, and image (3) with the EV set to “-1”. You will notice that the 2nd image is brightest, the 1st image is darker than image 2 and the 3rd image is the darkest.
There is an additional “metering mode” control that also helps the camera further understand what type of subject you are trying to take an image of, which will be discussed in our next lesson.