How to set your Camera’s; Aperture, Shutter Speed, and ISO

In the last lesson we talked about aperture and how it controls the amount of light entering the camera and the depth of field. However, we need to stop for a moment and first understand how to change the aperture setting on our camera.

Camera Settings Key

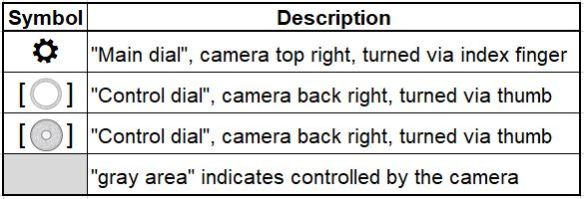
Key describing some of the symbols in the table below

Camera Settings Aperture Shutter Speed ISO

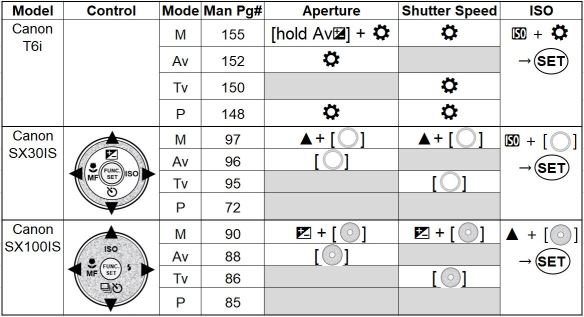
From the table above you see the buttons you would use to change the aperture, shutter speed, and ISO settings on three different cameras. The modes; manual (M), aperture priority (Av), shutter priority (Tv), and program (P) are the preferred camera modes to allow the user a better method of controlling the exposure. We will learn about these camera modes in a future lesson.

The cameras in the above table were chosen to show a variety from first a DLSR (T6i), then a bridge camera (SX30IS), and finally a compact camera (SX100IS). The intention is to continue to update this table with additional camera models, please leave a note below of the specific camera model you are using and hopefully I can add it to the table.

You can view/download the camera manuals seen in the above table from the following google drive camera manuals folder.

Creative control with aperture

Aperture_20180909_MG_5347

f/4, 1/400, ISO 400, @100mm

In the last lesson we learned that “aperture” controls the amount of light that reaches the camera sensor, by changing the size of the hole in the lens.

As we change the size of the hole in the lens, not only does it change the amount of light but also has an effect on how much of the image is in focus, called “Depth of Field” (DoF).

We can see from the image of the girl on the left that while her face and body are in focus, the trees in the background are completely out of focus. This is the “creative” control that the “aperture” setting provides, which is the ability to control how much of the image is within acceptable focus. Looking at the ground behind the girl’s foot we see the point where the ground goes from being in focus to blurry and then increasingly blurry the further we look toward the trees in the background.

PeggysCove_©TrevorAwalt_MG_2497-Edit_s

f/16, 1/8, ISO 100, @24mm

Looking at the lighthouse image on the left, we can see with an aperture setting of f/16, all of the image from the puddle reflection through to the lighthouse and then to the sky including the sun are all in focus. By setting our camera to a smaller aperture we can maximize the depth of field.

To summarize, “Depth of Field“, (DoF) is defined as the area of an image that is within acceptable sharpness, in front of and behind the focus point. The larger the aperture, for example f/4 (the image of the girl), the less DoF. Conversely the smaller the aperture, for example f/16 (the image of the lighthouse), the more DoF in an image.

In the next lesson we will learn how to change the aperture setting on your camera.