If your backyard has the resources for a wildlife friendly habitat it will be full of many wildlife photo opportunities. You may not have noticed as it takes spending time quietly waiting to see what is going on. The key elements for backyard birds, for example, are shelter, food, and water. Although it is never a good idea to be feeding wildlife, at some times of the year feeding wildlife is helpful to maintain species. For example during the winter months it is helpful to put out a bird feeder but take it down when its warm enough for the birds to forage insects for food, this causes wildlife habits to be more natural as well as minimizing disease. Planting or having trees and plants in your yard that are native to your area help with shelter as well as having a clean water source gets you well on your way to enjoying wildlife in your backyard. Even with no bird feeders in your yard there are times during the day you may consistently see birds looking for insects and their may be many other wildlife species as well.
This month I encourage you to create an image of your backyard wildlife. Using techniques you learned in last months low camera angle challenge by getting to eye level with your subject will make the photo more engaging. Spend the time, be patient and you will be rewarded with not only great images but exciting encounters.
Remember when out capturing wildlife photographs is that it takes time and patience, typically nothing happens right away. In the case of birds pick your spot, stay still and quietly wait near a perch. To obtain a clean background for your photo make sure your background is a significant distance from your perch.
You do not always need the biggest lens, your zoom kit lens 55mm to 250mm will work for many photos. It’s more important to learn to understand your subject and about how to get close. Due to light conditions and requiring higher shutter speeds, typically the ISO needs to be higher than you are used to shooting. Don’t be afraid of higher ISO, set your exposure brighter just slightly less than over exposure as well as fill the frame so you do not need to crop the image will provide better results.
Another important consideration is to use continuous autofocus which is used for moving subjects. With Canon it is called AI Servo and Nikon calls it AF-C.
Here are some general tips and techniques for backyard wildlife photography. Similar to last months challenge; set your aperture for the desired depth of field (typically between f4 through f8), adjust the camera settings for a correct exposure making sure you have a fast enough shutter speed to minimize or eliminate motion blur (typically 1/200 through 1/2000), focus on the subjects eye, find a good composition while considering the light, get your camera to eye level with your subject, and finally wait for the right moment. I have included the camera settings for the example images below to help.
For wildlife getting at eye level is more engaging for the viewer, sometimes you need to lay right down which helps with stabilizing your camera by resting your elbows on the ground. In the image below with the porcupine, we see the nice clean background as well as the animal is looking right at the camera. Don’t be afraid to get close, well not too close, and talk softly to the animal they will be curious, in this case the porcupine sat down and turned around to see who was talking.

f/4, 1/320, ISO 1250, @135mm
Wait for the right moment before you push the shutter. As you can see in the image below with the yellow warbler was captured while singing. Also notice the importance of a clean background and minimal distracting elements with the limb of a tree providing a natural perch.
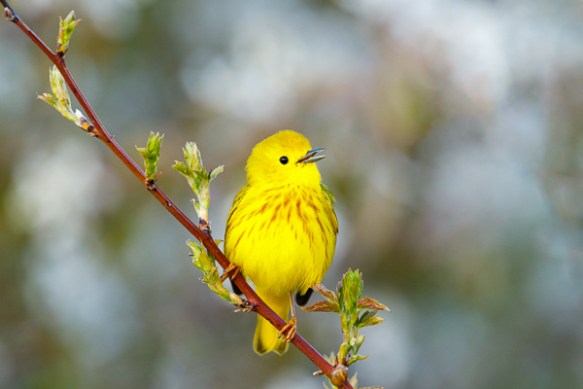
f/6.3, 1/500, ISO 2000, @600mm
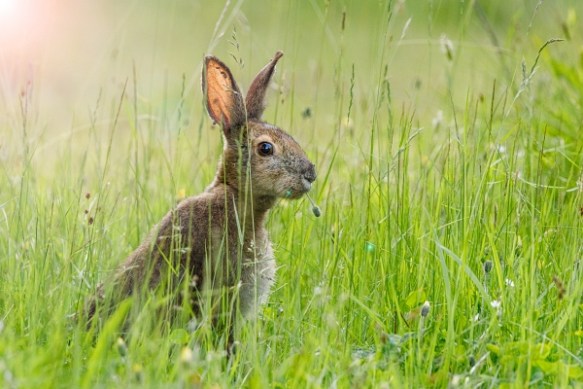
With the wild snowshoe hare in the image below, you may have to crawl around the ground to get close to your subject. Again getting to eye level by laying on the ground, use your elbows and your toes to move inch by inch to your subject. Remember softly talking to your subject may keep the subject calm, they just need to know you are not a threat. Keep your movements slow and deliberate so you don’t startle the subject. You will be amazed how close you can get.
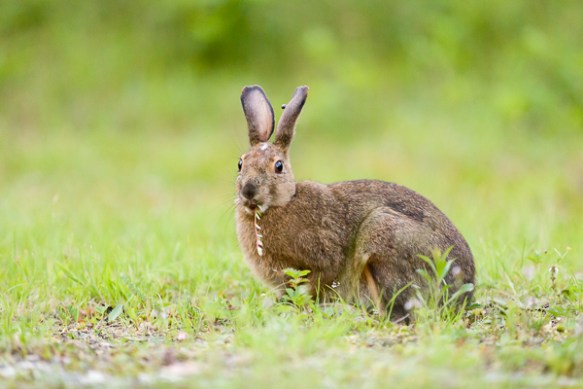
f/2.8, 1/320, ISO 4000, @200mm
As always check the result on the camera display by zooming in and around the image as well as reviewing the histogram to make sure everything is just right before you consider being finished taking your image(s).
Students are encouraged to develop their ability to tell a story or invoke an emotion, as well as how to plan and troubleshoot while creating their images. As such it’s important to not only create the image but to also include a “title”, and write a short paragraph about; how they came up with the idea, any interesting back ground that compelled them to make the image, and describe any techniques on how they overcame any obstacles.
As always with our monthly theme challenges we try to seek out an instructional resource, below are some YouTube video links to help with some important tips, hints and ideas.
Wildlife Photography instructional aids:
■ Backyard Bird Photography – The Bird Bath: by Moose Peterson (5min 15sec)
■ Attracting and Photographing Birds in Your Backyard (Beginner’s Guide): by Stefano Ianiro Wildlife (12min 54sec)
■ Tips and Tricks | How to be creative with wildlife photography: by Trond Westby (11min 44sec)
An important part of improving your photography is practice, which is one aspect of the monthly theme challenge, in addition you have an opportunity to learn about different genres, techniques and tips.