Unknown's avatar

About tgawalt

I am a photographer growing as an artist associated with Dream Imagine Believe Photography and You Can Learn Photography.

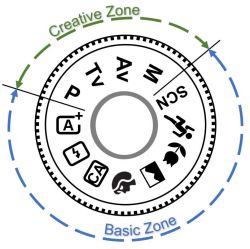
The camera “mode” dial

©Trevor Awalt - Mode Dial Canon T6i_C&B

Canon T6i Mode Dial

The camera mode dial provides a means for the user to help the camera make better aperture, shutter speed and ISO setting decisions based on typical scenarios.

The mode settings; M, Av, Tv, P, etc…, are set by turning the dial on your camera to the desired position that best suits the shooting scenario.

The mode dial is typically split into two areas; (1) the creative zone and (2) the basic zone. For this lesson we will discuss the modes within the “creative zone“.

M” – Manual Mode
The user takes complete control setting the aperture, shutter speed, and ISO for a correct exposure based on the camera’s exposure metering mode, also set by the user. The exposure value is the resulting exposure from the user settings, displayed on the camera’s reflective meter. The camera can auto adjust the ISO if it is set to AUTO. The user can limit the highest ISO value via a setting typically found in the camera menu.

Av” – (Nikon “A”) Aperture Priority Mode
The user takes control of setting the aperture and ISO. The camera automatically sets the shutter speed for a correct exposure based on the current exposure metering mode setting and the exposure compensation setting, both controlled by the user. Aperture is part of the creative control for depth of field. The camera will also adjust the ISO if it is set to AUTO. The user can limit the highest ISO value via a setting typically found in the camera menu.

Tv” – (Nikon “S”) Time Value (Shutter Priority) Mode
The user takes control of setting the shutter speed and ISO. The camera automatically sets the aperture for a correct exposure based on the current exposure metering mode setting and the exposure compensation setting, both controlled by the user. Shutter Speed is part of the creative control to show motion. The camera will also adjust the ISO if it is set to AUTO. The user can limit the highest ISO value via a setting typically found in the camera menu.

P” – Program mode (Does NOT mean Professional Mode)
The camera automatically sets the shutter speed and the aperture value for a correct exposure based on the current exposure metering mode setting and the exposure compensation setting, both controlled by the user.

In “P” mode the camera uses an algorithm based on the amount of available light in addition to the lens aperture and focal length capabilities. The user can adjust the camera’s determined settings by moving the main dial (on the top right front of the camera adjusted with your index finger). While adjusting the main dial you will see both the shutter speed & aperture change, however, once the lens has reached the widest aperture you will not be able to adjust the shutter speed any higher. Note the algorithm starts fresh each time you take a picture.

The camera will also adjust the ISO if it is set to AUTO, the camera tends to use the lowest possible value while still maintaining a minimum of 1/(focal length) shutter speed. The user can limit the highest ISO value via a setting typically found in the camera menu.

In our next lesson we will discuss how a camera performs auto focus and what the settings mean.
June Theme Challenge – “Black & White”

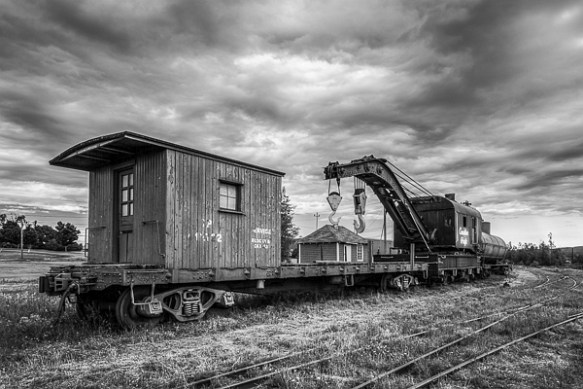
For this month, June 2019, the theme challenge is “Black & White” also known as “Monochrome”.

©Trevor Awalt_100 Ton Steam Train_s

There are many opportunities for monochrome images such as dramatic clouds and older style subjects, even during harsh daylight is a great time to consider choosing monochrome to capture your images.

It is important to be able to preview your images on the camera in “monochrome”, which will help you visualize your result as you are shooting. To shoot in “monochrome” requires a change to the camera settings.

As an example lets see how to setup two Cameras to shoot in monochrome:

  • Change the “My Colors” setting on a Canon SX30, (manual pg 79); press the “func/set”, on the back of the camera, then use the up/down arrow buttons to choose the “My Colors” option. Then press the right/left arrow buttons to pick the “Se” (sepia) or “BW” (black&white) option and then press “func/set” to choose the selected option. (Warning: It is important to know that when shooting in “Jpeg” the captured image will not have any colour, remember to change the “My Color” option back to “OFF” when done shooting monochrome images to allow capturing any new images in colour.)
  • Change the “Picture Style” setting on a Canon T6i to “M” (monochrome), (manual starting on pg 125),  press the down arrow (picture style) button, on the back of the camera, and then press the right/left arrow buttons, on the back of the camera, to pick the “M” (monochrome) and then press “set” to choose the selected picture style. Before pressing “set”, you can also press the “info” button to change the sharpness, contrast, filter effect and tone effect (example sepia) as well. (Warning: It is important to know that when shooting in “Jpeg” the captured image will not have any colour, remember to change the “Picture Style” option back to the previous setting such as “S” (standard) when done shooting monochrome images to allow capturing any new images in colour.) Note shooting in “RAW” retains the colour information.

Students are encouraged to develop their ability to tell a story or invoke an emotion, as well as how to plan and troubleshoot while creating their images. As such it’s important to not only create the image but to also include a “title”, and write a short paragraph about; how they came up with the idea, any interesting back ground that compelled them to make the image, and describe any techniques on how they overcame any obstacles.

As always with our monthly theme challenges we try to seek out an instructional resource, below is a YouTube video link to give you some hints and ideas.
B&H Event Space instructional aid:
Black and White Photography in the Digital Era
Speaker: Harold Davis
Link: Black and White Photography in the Digital Era (38min 15sec)

An important part of improving your photography is practice, which is one aspect of the monthly theme challenge in addition you have an opportunity to learn about different genres, techniques and tips.