What is “Focal Length” and it’s effect

In past lessons we mentioned “focal length” from a simplistic point of view as the amount of magnification that a lens optical system provides.

Digging a bit deeper, we learn that “Focal length” (FL) is measured in millimeters (mm) and represents the distance between the lens and the focal plane (the recording medium, in our case a digital sensor).

Focal Length

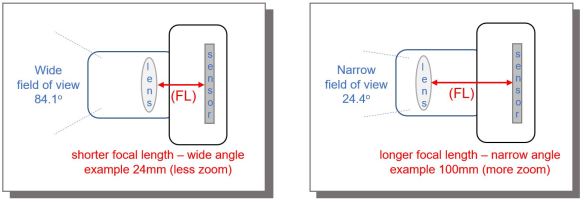
Consider two lenses; one is 24mm (shown on the left) and the other is 100mm (shown on the right). At a focal length of 24mm, considered a wide angle lens, has a wide field of view of 84.1° which has less magnification than the 100mm lens. At a focal length of 100mm, considered a medium telephoto lens, has a much more narrow field of view of 24.4° which has more magnification than the 24mm lens. A subject will appear closer using a 100mm lens verses using a 24mm lens, what we understand as more magnification.

With aperture we learned that “focal length” plays a role in “depth of field”. In the case of “shutter speed” the “focal length” plays a role with both image sharpness and image blur.

The image of the Kingfisher on the left, f/8, 1/800, ISO 400, @ 600mm, notice the body of the bird and tree limb are sharp, while the bird’s beak and portions of the it’s head are not sharp. This is due to the Kingfisher shaking it’s head while the 1/800 of a second shutter speed used to capture the image was too slow to freeze the action. The result is portions of the image, specifically the bird’s head and beak, are blurred. In this case, although somewhat unconventional, the blur in the image conveys more of a story as the blur is conveying motion to the viewer versus the typical static image of the Kingfisher on the right.

Looking closely notice the eye is still pretty sharp, this is due to the pivot point of the bird’s head where there is less motion at the pivot point, the center of the bird’s head, verses more motion at the end of the bird’s beak. This motion is also magnified by the 600mm long focal length used to capture the image.

Both Kingfisher images were taken using a tripod and gimbal head, therefore there was no image blur due to camera movement known as “camera shake” to be discussed in our next lesson.

How “shutter speed” plays it’s role in exposure

With a DSLR the “shutter” is a mechanical mechanism. In a compact, bridge or phone camera the shutter is non-mechanical and is achieved by using an electronic method of reading the pixels of the sensor in groups of lines over a period of time. To simplify our discussion we will think of the shutter as a mechanism.

The “shutter” can be imagined as a curtain in front of the camera sensor. This curtain opens for a specific period of time allowing the light to reach the sensor and then closes to block the light from the sensor. The “duration” of time the light is contacting the sensor is referred to as the “shutter speed” and is what contributes to the exposure.

Mechanical Shutter

In the diagram step 1 shows the shutter in it’s normal closed state. When we push the “shutter button” on our camera the shutter opens, as shown in step 2, by the 1st curtain moving to the top and allowing the light to reach the sensor. Once the duration of the shutter speed has been reached the shutter closes, as shown in step 3. Finally the shutter mechanism resets to the normal closed state by the 1st and 2nd curtain moving together back to the bottom as shown back at step 1.

To recap we have learned in previous lessons that “aperture” is a hole in the lens which allows an amount of constant light into the camera based on the size of the hole we set. The “shutter speed” controls the “duration” of time the light is allowed to reach the sensor. The combination of these two settings, aperture and shutter speed in addition to the amplification (iso) of the sensor  determines the “exposure“, or the brightness of our captured image.

To find out how to set the shutter speed on your camera, refer to a previous lesson How to set your Camera’s; Aperture, Shutter Speed, and ISO.

Shutter Speed Typical Values

Shutter speed settings are in fractions of seconds to seconds in duration, which can be from 1/4000 (fast, less light), or 1/8000 on advanced cameras, of a second down to 30 (slow, more light) seconds in duration and depending on the mode you have selected you can control the this speed in full stops, typical values shown in bold, or 1/3 stop increments.

The shutter speed setting can affect sharpness and/or blur in your captured image, which we will discuss in our next lesson.